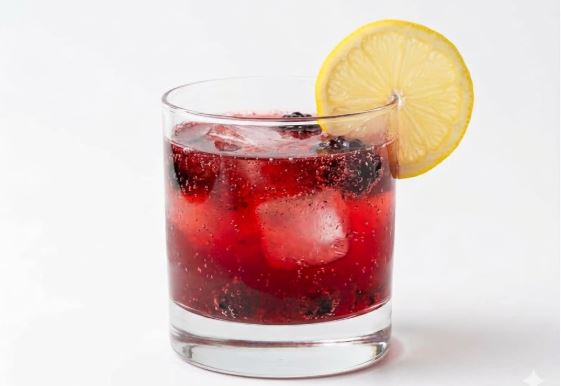
This is a Lemon Blackberry Fizz Mocktail – herbaceous, tangy, and made with muddled blackberries, homemade thyme simple syrup, and bright lemon that creates one of the most special drinks you can make in about 5 minutes. You might not think to pair blackberries with …
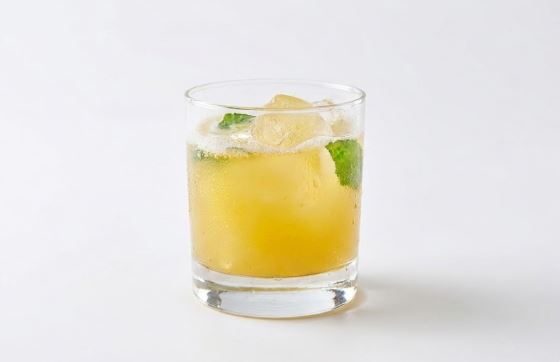
This is a Pineapple Spritzer Mocktail – tropical, creamy, and made with just 4 ingredients that blend into the most refreshing drink. You may think it’s just another pineapple drink recipe, but this one is different. I love it, and I make zero apologies for …
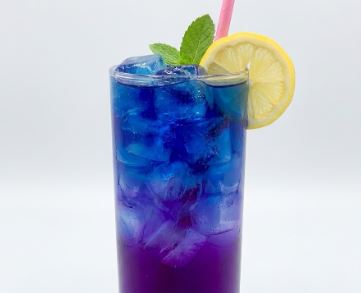
This is Citrus Magic – a stunning blue-and-purple gradient mocktail made with butterfly pea flowers that literally changes colour when you add citrus.
It’s possible you haven’t heard of butterfly pea flowers before, but trust me, once you see what these little dried blooms can do, you’ll be obsessed. I love this drink, and I’m not ashamed to admit that I’ve made it approximately seventeen times just to watch the magical transformation of the color from blue to purple.
To make this cocktail, I use only natural ingredients: butterfly pea flowers create the insane electric blue colour naturally, and when you add citrus (lemon, lime, or grapefruit), it transforms into purple right before your eyes. The magic never gets old.
I do take liberty with making this more visually dramatic, though – instead of just serving it over regular ice, I freeze the butterfly pea tea into ice cubes and blend them into a slushy texture, then layer it with regular crushed ice for this gorgeous blue-and-white gradient effect. Also, I give you options on which citrus to use because they all work beautifully and create slightly different flavour profiles.
If you’ve only ever had boring, clear or artificially-coloured drinks, I really think you’ll love this naturally vibrant, colour-changing version.
Why use butterfly pea flowers
Here’s the thing about butterfly pea flowers: they’re not just pretty, they’re actually functional and good for you. These little dried blue flowers are packed with antioxidants, support glowing skin (the flavonoids stimulate collagen production), and contain anthocyanins, which are excellent for overall health. Studies show they help ease stress, AND they’re completely caffeine-free, so you can drink them any time of day without turning into a jittery mess.
But the real party trick? The colour-change. Butterfly pea flowers create this stunning electric blue tea, and when you add anything acidic (lemon, lime, grapefruit, even vinegar if you’re feeling experimental), it turns from blue to purple or pink depending on how much acid you add. It’s pH-sensitive chemistry at work, and it never stops being cool to watch.
The tea itself has a very mild, earthy flavour – kind of like a gentle green tea – so it’s not overpowering. You’re really using it for the spectacular colour and health benefits more than intense flavour, which makes it perfect for mocktails where you want other ingredients to shine.
You can find butterfly pea flowers at reputable tea shops, health food stores, or online. A little goes a long way – 15 flowers make enough blue tea for 4 drinks.
Here’s what you need to make this
This recipe serves 4 and requires some advance planning (you’ll need to freeze ice cubes), but the actual assembly is ridiculously easy. You can also prepare it ahead of time for special occasions.
1. BUTTERFLY PEA FLOWERS
Butterfly pea flowers – 15 dried flowers (sometimes called blue pea flowers or Asian pigeonwings). These create the stunning blue colour naturally. Don’t skip these. You can find them at tea shops, Asian markets, health food stores, or online.
Boiling water – 2 cups to steep the flowers and extract all that gorgeous blue colour.
Steeping time – 30 minutes. This isn’t quick like regular tea! You need to steep them longer to extract maximum colour. The longer you steep, the more vibrant the blue (though 30 minutes is the sweet spot).
2. ICE SITUATION
You’ll need TWO types of ice:
Butterfly pea ice cubes – Made by freezing the blue tea into ice cube trays. These get blended into a slushy texture for that dramatic blue layer.
Regular ice cubes – Made by freezing 2 cups of regular water. These also get blended for the white layer that creates the gradient effect.
The layering is what makes this drink so visually spectacular. You get this blue-and-white ombré effect before you even add the citrus, and then the colour-changing magic happens when the acid hits!
3. CITRUS
Fresh citrus juice – 2-4 tablespoons total (about 1 tablespoon per drink). You can use lemon, lime, or grapefruit – they all work. Each creates a slightly different flavour:
Lemon: Classic, bright, tangy. Most versatile option.
Lime: Tart, tropical vibes, slightly more assertive.
Grapefruit: My personal favourite! Slightly bitter-sweet, very sophisticated, gorgeous pink colour shift.
MUST be freshly squeezed. You knew I was going to say that, right? I’m nothing if not consistent about fresh citrus!)
The amount isn’t super fixed – you can add a little more if you like it tangier, or less if you want it milder. The citrus does two things: adds flavour AND triggers that colour change from blue to purple.
4. SPARKLING BEVERAGE
Your favourite sparkling drink – Any sparkling water, club soda, lemon-lime soda, or even homemade lemonade works here.
I usually use plain sparkling water because I like letting the butterfly pea tea and citrus be the stars, but if you want it sweeter, lemon-lime soda is excellent. You could also use tonic water for a slightly bitter edge, or ginger ale for warmth. All good options!
Make sure whatever you use is well-chilled.
5. GARNISH
Lemon wheels or citrus slices – For the rim. Very pretty.
Butterfly pea flowers – If you have extras, a single flower floating on top or tucked into the garnish looks absolutely stunning.
Fresh herbs – Mint or basil would be lovely if you want to add an herbal element.
How to make Butterfly Pea Tea Ice
This is the foundation of the whole drink, and it needs to be done ahead of time (at least 2 hours before serving, ideally the night before). But it’s stupidly easy – mostly just waiting for things to freeze.
Steep the flowers – Place 15 butterfly pea flowers in a heatproof jug or container. Pour 2 cups of boiling water over them and let it steep for 30 minutes. You’ll see the water turn this incredible electric blue almost immediately, but the longer it steeps, the more it extracts more colour.
Don’t be tempted to rush this – the 30 minutes make a difference in colour intensity.
Strain – After 30 minutes, strain out the flowers and discard them (or compost them – they’ve given their all!). You should have about 2 cups of vibrant blue liquid.
Freeze blue ice – Pour the blue tea into ice cube trays and freeze until solid, at least 2 hours (overnight is ideal). You’ll end up with these gorgeous blue ice cubes that look like little sapphires.
Freeze regular ice – At the same time, freeze 2 cups of regular water into ice cubes in separate trays. These create the white layer for the gradient effect.
Blend separately – Once frozen solid, blend the blue ice cubes in a high-speed blender until they’re slushy with some chunks still intact – you want texture, not a completely smooth slush. Transfer to a freezer-safe container and return to the freezer.
Repeat with the regular ice cubes – blend until slushy, transfer to a separate container, freeze.
If you don’t have a high-speed blender, a food processor works, or you can just crush the ice in a bag with a rolling pin or mallet. The goal is crushed/slushy ice, not cubes.
Store until ready – Keep both types of ice in separate containers in the freezer until you’re ready to build your drinks. They’ll keep for several days, so you can prep well ahead of time.
How to make Citrus Magic Blue Mocktail
Once you’ve got your two types of slushy ice ready, building these drinks is genuinely fast and fun. It’s like being an artist with a very edible, drinkable canvas.
Layer the ice – Grab tall glasses (Collins or highball glasses work best to show off the gradient). Fill each glass about halfway with the regular white crushed ice. Then top with the blue butterfly pea slushy ice. You should see this gorgeous white-to-blue gradient forming.
Pack it in gently so the layers stay somewhat distinct – you want that ombré effect!
Add citrus – Pour about 1 tablespoon of freshly squeezed citrus (lemon, lime, or grapefruit) into each glass. THIS IS WHERE THE MAGIC HAPPENS! Watch as the blue ice starts turning purple wherever the citrus touches it. It’s genuinely mesmerizing and never gets old, even if you’ve made this drink a hundred times.
The amount of citrus isn’t super precise – add a bit more if you want a stronger colour change and tangier flavour, or less if you prefer it milder.
Top with more blue ice – Add a bit more butterfly pea slushy ice on top. This creates more surface area for the colour-changing reaction and looks gorgeous.
Add sparkling beverage – Top up each glass with your chosen sparkling drink (sparkling water, lemon-lime soda, whatever you’re using). Pour slowly to preserve the fizz.
Stir and watch – Give it a gentle stir and watch the colours swirl and change! You’ll see blues, purples, and pinks all mixing together as the citrus disperses through the drink. It’s like a lava lamp but delicious.
Garnish and serve – Add a lemon wheel to the rim, tuck in a butterfly pea flower if you have extras, maybe add a sprig of mint. Serve immediately with a straw (preferably a fun colourful one because this drink is all about the visual drama!).
Hand it to someone and watch their face light up. Works every time.
If you enjoy this mocktail, you might also like the orange fizz, which also has a citrus note.
What I serve with this mocktail
If we’re talking actual food pairings, this is excellent for brunches (the mild flavour goes with everything from eggs benedict to fruit salad), summer BBQs, pool parties, or as a welcome drink for any celebration. The flavour is light and refreshing, so it pairs well with most foods without overwhelming them.
If you’re putting together a mocktail menu, my Lavender Lemonade and Blue Lagoon Mocktail have similar vibrant colour vibes, or go completely different with the Blueberry Lemon Thyme Cooler or Cherry Rosemary Mocktail for variety.
The first time I made this, I tried to skip the whole “blend the ice separately” step and just threw everything together, thinking it would save time. Reader, it did not work. The colours got muddy and mixed together immediately, and it just looked grey-ish purple. You don’t want that!
The separate layering is what creates that stunning gradient effect, so don’t skip it even though it’s an extra step.
If you’re wondering whether you can make this without the fancy ice situation, you can just serve it over regular ice cubes. Just freeze the butterfly pea tea into cubes, put them in a glass with regular ice, add citrus, and sparkling water. It’ll still change colour (which is cool), you just won’t get that dramatic layered ombré effect, but it will still be delicious.
Citrus Magic Blue Mocktail FAQ
Where do I find butterfly pea flowers?
You can usually find dried butterfly pea flowers at Asian grocery stores, herbal tea shops, health food stores, or online marketplaces. They’re often sold as “butterfly pea tea” or “blue tea.” Fresh flowers are harder to find unless you grow them yourself.
Can I make this without blending the ice?
Yes. You can skip blending and simply pour the drink over regular ice cubes. The texture will be lighter and less slushy, but the flavour and colour effect will still work.
How long does the butterfly pea tea last?
Brewed butterfly pea tea usually stays fresh for about 3–5 days in the refrigerator when stored in a sealed container. The colour may fade slightly over time, but it’s still usable.
Will other acidic ingredients work for the colour change?
Yes. The blue tea changes colour when it meets acidic ingredients. Besides lemon or lime juice, you can also use:
Orange juice
Pineapple juice
Passion fruit juice
Vinegar (small amounts)
Citric acid powder
Different acids can create shades ranging from purple to pink, depending on how much you add.
Citrus Magic Blue Mocktail
This stunning blue mocktail uses butterfly pea flowers to create a natural electric blue colour that magically transforms to purple when citrus is added. Made with layered blue and white crushed ice for a gorgeous gradient effect,
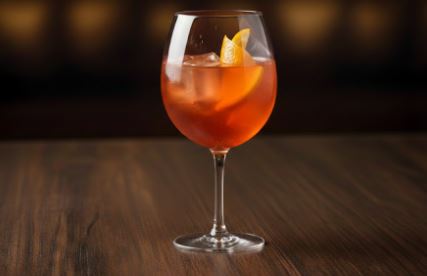
The Amalfi Spritz mocktail is a refreshing non-alcoholic version of the classic Aperol Spritz that delivers all the bitter-sweet complexity of the original. The vibrant orange color, the gentle bitterness balanced with sweetness, the celebratory bubbles – it’s the essence of an Italian summer, whether …
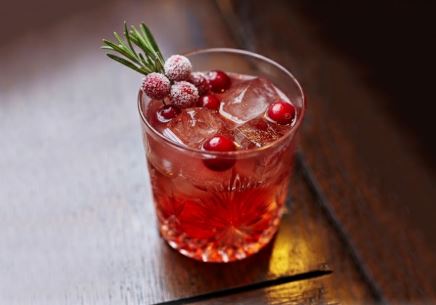
The cranberry spritzer mocktail (or cranberry spritz mocktail) is a nice non-alcoholic drink that rivals its alcoholic inspiration. The vibrant ruby color, the perfect balance of tart cranberry and bitter-sweet aperitif, all completed with sparkling sugared garnishes that excite the taste buds. This isn’t a …
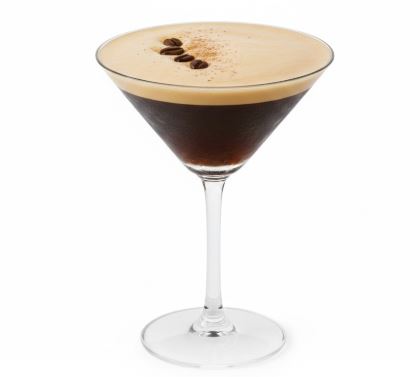
There are few cocktails as polarizing, or as loved by cocktail aficionados, as the Negroni. That perfect trinity of gin, Campari, and sweet vermouth has been captivating drinkers since 1919, with its bold bitterness and striking ruby color. Now imagine taking that classic Italian aperitivo, adding the depth and complexity of coffee, and making it completely non-alcoholic. The result? This non-alcoholic espresso Negroni mocktail.
This isn’t a watered-down approximation or a consolation prize. It’s a genuinely compelling beverage that stands on its own merits, offering layer upon layer of flavor – bitter, sweet, spiced, coffee-forward, citrusy – all perfectly balanced in a single glass. Whether you’re a Negroni lover looking for a non-alcoholic option or someone who’s never had a Negroni but prefers the non-alcoholic version, this mocktail will impress.
What is a Negroni and Where Did it Come From?
The Negroni is one of the most celebrated cocktails in the world, a perfect example of how three simple ingredients can create something far greater than the sum of its parts. The classic recipe is equal parts gin, Campari (an Italian bitter aperitif), and sweet vermouth, stirred with ice and garnished with an orange peel.
The drink’s origin story, like many classic cocktails, is part history and part legend. The most widely accepted tale places its creation in Florence, Italy, in 1919. Count Camillo Negroni, a regular at Caffè Casoni, asked the bartender to strengthen his favorite cocktail – the Americano (Campari, sweet vermouth, and soda water) – by replacing the soda with gin. The bartender obliged, swapped the lemon garnish for orange, and the Negroni was born.
What makes the Negroni special is its unapologetic bitterness. This isn’t a drink for everyone – Campari’s intense, herbal bitterness is divisive. People tend to either love Negronis or hate them, with little middle ground. Those who love them appreciate the complexity, the balance between bitter and sweet, the way the botanical gin plays with the herbal Campari, and how the sweet vermouth rounds everything out.
The Non-alcoholic Espresso Negroni Variation
The espresso Negroni is a modern variation that adds coffee liqueur to the classic formula, creating something even more complex and layered. The coffee element adds depth, slight sweetness, and roasted notes that complement the bitter Campari beautifully. It also adds another layer of sophistication that appeals to coffee lovers.
This mocktail version takes that concept and makes it completely non-alcoholic by using:
Non-alcoholic Jamaican spiced rum (for complexity and spice notes)
Non-alcoholic coffee liqueur (for coffee depth and sweetness)
Non-alcoholic Italian bitter (for that essential Campari-like bitterness)
Non-alcoholic sweet vermouth (for herbal sweetness and body)
The result retains the essence of both a classic Negroni and an espresso Negroni while being completely alcohol-free.
Understanding the Italian Aperitivo Tradition
To appreciate this mocktail, it helps to understand the tradition it comes from. In Italian culture, the aperitivo is a pre-dinner ritual – typically occurring between 6-8 PM – where you enjoy a drink and small snacks to stimulate your appetite before the evening meal.
Aperitivo drinks are traditionally bitter because bitterness stimulates saliva production and digestive enzymes, literally preparing your body for food. This is why drinks like the Negroni, Aperol Spritz, and Americano are aperitifs rather than after-dinner drinks.
The Negroni embodies this tradition perfectly – it’s strong enough to feel substantial, bitter enough to awaken your palate, yet balanced enough to not overwhelm. It’s meant to be sipped slowly while socializing, marking that crucial transition from the workday to leisure time.
This non-alcoholic version honors that tradition, allowing everyone to participate in aperitivo culture regardless of their relationship with alcohol.
The Rise of Non-Alcoholic Spirits
This mocktail wouldn’t have been possible even five years ago. The explosion of craft non-alcoholic spirits has revolutionized what’s possible in mocktail-making. Companies are now creating sophisticated products that capture the complexity, botanicals, and even the mouthfeel of traditional spirits without any alcohol.
These aren’t “de-alcoholized” versions where alcohol is removed (which often leaves thin, disappointing results). Instead, they’re built from the ground up using botanicals, extracts, and innovative techniques to create depth and complexity without relying on alcohol as a flavor carrier or preservative.
This matters because cocktail culture isn’t just about alcohol – it’s about ritual, craftsmanship, sophistication, and the sensory experience of a well-balanced drink. Quality non-alcoholic spirits make all of this accessible to non-drinkers.
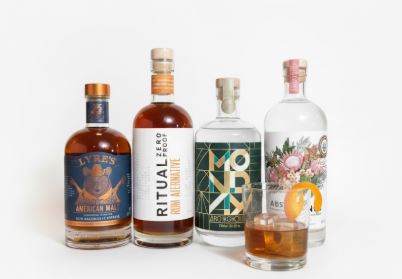
Non-Alcoholic Espresso Negroni Ingredients
This recipe requires four non-alcoholic spirits plus a garnish. The quality of your non-alcoholic spirits is crucial – this is a spirit-forward drink with nowhere to hide. Here’s what you’ll need. For exact measurements, see the recipe card below.
The Spirit Components
Non-Alcoholic Jamaican Spiced Rum (1 oz/30ml): This might seem like an unusual choice for a Negroni-style drink, but hear me out. Traditional Negronis use gin, which provides botanical complexity. In this non-alcoholic version, a spiced rum alternative brings its own complexity through warm spices like vanilla, cinnamon, nutmeg, and clove.
Look for quality non-alcoholic rum alternatives like Lyre’s Dark Cane Spirit, Ritual Rum Alternative, or similar products. These are crafted to provide the molasses depth, spice complexity, and slight sweetness that rum brings to cocktails.
Why rum instead of non-alcoholic gin? While you could certainly use a non-alcoholic gin, the spiced rum adds warmth and complexity that plays beautifully with the coffee element, creating a more cohesive, rounded drink. If you prefer, substitute with 1 oz of non-alcoholic gin for a more traditional profile.
Non-Alcoholic Coffee Liqueur (¼ oz/8ml): This is the espresso element that distinguishes this from a regular Negroni. Coffee liqueur brings rich, roasted coffee flavor with sweetness that balances the bitterness.
Mr. Black Cold Brew Coffee Liqueur makes a non-alcoholic version, or you could use other coffee liqueurs like Lyre’s Coffee Originale. In a pinch, you could even use a concentrated cold brew coffee sweetened with simple syrup, though it won’t have quite the same depth.
The amount is deliberately small – you want coffee notes without this becoming a coffee drink. It should be a supporting character, not the star.
Non-Alcoholic Italian Bitter (1½ oz/45ml): This is the soul of the Negroni – the bitter element that defines the drink. You need a non-alcoholic aperitif that captures the intense, herbal bitterness of Campari.
Excellent options include:
Lyre’s Italian Orange (designed specifically to mimic Campari)
The Italian bitter is the largest component in this recipe, making it the dominant flavor. Choose a quality product – this is where you’ll taste the difference between good and great.
Non-Alcoholic Sweet Vermouth (½ oz/15ml): Sweet (red) vermouth is a fortified wine infused with botanicals, herbs, and spices. It adds sweetness, body, and herbal complexity that rounds out the bitter elements.
Drink NOA makes an excellent non-alcoholic vermouth, as does Lyre’s Aperitif Rosso. These products capture the sweet, herbal, slightly oxidized flavor profile of traditional sweet vermouth.
The vermouth might seem like a small component, but it’s crucial for balance. It keeps the drink from being overwhelmingly bitter and adds aromatic complexity.
The Garnish
Grapefruit peel: Unlike the traditional Negroni (which uses orange peel), this version calls for grapefruit. The grapefruit’s slightly more bitter, more tart citrus oils complement the coffee element beautifully and add a gorgeous aromatic component.
The peel should be expressed over the drink (twisted to release the oils) before being added as a garnish. This isn’t just decoration – the citrus oils significantly impact the aroma and therefore the perceived flavor.
Use fresh grapefruit and cut a wide peel (about 2 inches long and 1 inch wide) with as little white pith as possible. The pith is bitter in an unpleasant way.
Why grapefruit instead of orange? The coffee element in this drink pairs better with grapefruit’s slight bitterness than with orange’s sweeter profile. That said, orange peel also works if you prefer – it just creates a slightly different drink.
Equipment You’ll Need
Mixing glass: A proper mixing glass allows you to stir the drink with ice, properly chilling and diluting it. If you don’t have a mixing glass, use any glass or small pitcher that can accommodate ice and 3 oz of liquid.
Bar spoon: A long-handled spoon for stirring. The long handle and twisted shaft are designed for efficient stirring, but a regular spoon works in a pinch.
Strainer: A Hawthorne strainer or julep strainer for pouring the stirred drink into your serving glass while leaving the ice behind. A small fine-mesh strainer also works.
Jigger: For accurate measuring. Precision matters in spirit-forward drinks like this.
Rocks glass: Also called an old-fashioned glass. A short, wide glass designed for drinks served over ice.
Channel knife or vegetable peeler: For cutting citrus peels.
How to Make a Non-Alcoholic Espresso Negroni Step-By-Step
This is a stirred cocktail, not shaken – an important distinction. Stirring creates a silky, smooth texture without introducing air bubbles or making the drink cloudy. The technique is simple but important for achieving the right dilution and temperature.
Step 1: Chill your serving glass. Place your rocks glass in the freezer for at least 10 minutes before making the drink. A cold glass helps maintain the drink’s temperature longer. Alternatively, fill it with ice water while you prepare the drink, then dump it out just before serving.
Step 2: Prepare your large ice cube for serving. Negronis are traditionally served over one large ice cube rather than multiple small cubes. Large ice melts more slowly, keeping your drink cold without diluting it too quickly. If you don’t have large ice cube molds, regular ice cubes work – you’ll just need to drink it slightly faster.
Step 3: Fill your mixing glass about halfway with ice. You need enough ice to properly chill and dilute the drink, but not so much that there’s no room for stirring. Standard ice cubes are fine for mixing.
Step 4: Add all the liquid ingredients to the mixing glass with ice:
1 oz (30ml) non-alcoholic Jamaican spiced rum
¼ oz (8ml) non-alcoholic coffee liqueur
1½ oz (45ml) non-alcoholic Italian bitter
½ oz (15ml) non-alcoholic sweet vermouth
Step 5: Stir with purpose and patience. Insert your bar spoon into the mixing glass and stir smoothly in one direction (it doesn’t matter which). Use fluid, circular motions, keeping the spoon against the inside of the glass. Stir for 30-45 seconds, or as the recipe says, “until your fingers become very cold.”
Why this matters: Stirring serves two purposes. First, it chills the drink to the proper temperature (which makes all the flavors more balanced and pleasant). Second, it adds water through dilution as the ice melts, which actually improves the drink by softening harsh edges and opening up flavors.
How do you know when it’s done? The mixing glass should feel very cold to the touch. Your fingers should be uncomfortably cold if you’re holding the glass. The drink should look slightly viscous and silky. This typically takes 30-45 seconds of continuous stirring.
Step 6: Prepare your garnish while the drink finishes stirring. Cut a piece of grapefruit peel about 2 inches long and ¾ to 1 inch wide. Try to get mostly the colored outer peel with minimal white pith. The peel should be thick enough to bend without breaking but thin enough to express oils.
Step 7: Place your large ice cube in your chilled serving glass. The single large cube is traditional and practical for Negronis.
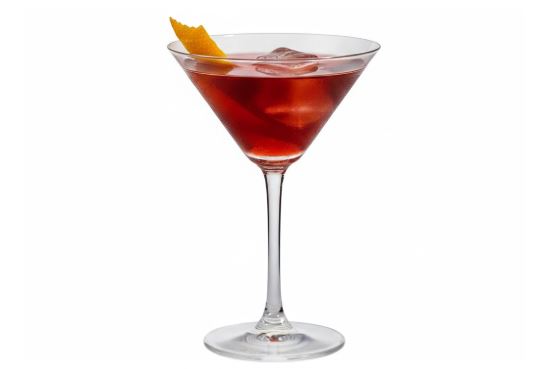
Step 8: Strain the stirred drink over the ice cube. Hold your strainer over the mixing glass and pour the deep, dark liquid into your serving glass. It should have a beautiful, rich color – somewhere between deep burgundy and chocolate brown.
Step 9: Express the grapefruit peel. Hold the peel over the drink, colored side down, between your thumb and fingers. Quickly bend or twist it, expressing the citrus oils onto the surface of the drink. You should see a fine mist of oils spray across the drink’s surface. This is crucial – these aromatic oils significantly impact the drinking experience.
Step 10: Rub the expressed peel around the rim of the glass, then drop it into the drink or hang it on the rim as a garnish. The rim-rubbing adds citrus aroma with each sip.
Step 11: Serve immediately. Unlike many cocktails, a Negroni should be sipped slowly – it’s a contemplative drink meant for leisurely enjoyment.
Stirring vs. Shaking Espresso Negroni
Why is this drink stirred instead of shaken? It’s not arbitrary – the technique affects the final product:
Stirred drinks are smoother, silkier, and clearer. Stirring gently incorporates water through dilution while maintaining the drink’s clarity and creating a smooth mouthfeel. This is ideal for spirit-forward cocktails where you want to taste the individual components harmonizing together.
Shaken drinks are colder, more diluted, and aerated (slightly cloudy). Shaking is great for drinks with citrus juice, cream, or egg whites where you want incorporation and texture, but it would make this Negroni too diluted and cloudy.
The general rule: if all ingredients are spirits (no juice or dairy), stir. If there’s citrus juice, cream, or egg whites, shake.
Understanding the Flavor Profile
This is a complex drink. Here’s what to expect:
First sip: A wave of bitterness from the Italian bitter, immediately followed by coffee notes and citrus aroma from the grapefruit peel.
Mid-palate: The spiced rum’s warmth comes forward with notes of vanilla and baking spices. The sweet vermouth adds herbal complexity. The coffee provides depth and roasted notes.
Finish: Clean bitterness that lingers pleasantly, with subtle coffee and spice notes trailing off.
Overall character: Bitter, complex, slightly sweet, coffee-forward, warming. This is an adult drink – sophisticated, not crowd-pleasing. If you love bitter flavors and coffee, you’ll likely love this. If you don’t like bitterness, this might not be for you.
The surprise: Despite being non-alcoholic, this has remarkable depth and complexity. The multiple layers of flavor give your palate something new with each sip.
When to Serve a Non-Alcoholic Espresso Negroni
This drink works in specific contexts:
Aperitivo Hour: The traditional time – early evening before dinner. The bitterness stimulates the appetite.
After-Dinner Alternative: Despite being an aperitif traditionally, the coffee element makes this work as an after-dinner drink too, similar to an espresso martini.
Cocktail Hour: When entertaining, offer this alongside regular cocktails for a sophisticated non-alcoholic option.
Date Night at Home: Impress your partner with your bartending skills. This is a romantic, elegant drink.
Quiet Evening: This is a contemplative drink perfect for slow sipping while reading or unwinding.
Business Meetings: For professional lunches or dinners where you want something sophisticated but can’t drink alcohol.
Coffee Alternative: For afternoon pick-me-ups, this provides coffee flavor in a more interesting format.
This isn’t a party drink or a crowd-pleaser – it’s for people who appreciate complex, bitter flavors and are willing to sip slowly and pay attention.
Customizing Your Espresso Negroni
While this recipe is beautifully balanced as written, here are variations to try:
More Coffee-Forward: Increase the coffee liqueur to ½ oz for a stronger coffee presence.
Extra Bitter: Increase the Italian bitter to 2 oz and decrease the rum to ½ oz for a more aggressively bitter version.
Sweeter Version: Add ¼ oz simple syrup if the bitterness is too intense.
Classic Negroni Style: Omit the coffee liqueur and use 1 oz each of the rum (or substitute non-alcoholic gin), Italian bitter, and sweet vermouth for a non-alcoholic classic Negroni.
Orange Instead of Coffee: Replace the coffee liqueur with ¼ oz orange liqueur or orange juice concentrate for a more traditional profile.
Different Garnish: Try orange peel instead of grapefruit for a sweeter, more traditional Negroni experience.
White Negroni: Use non-alcoholic gin, Lillet Blanc alternative, and gentian liqueur for a completely different but equally bitter take.
Rich Foods: The bitterness cuts through fatty, rich foods beautifully. Pair with charcuterie, pâté, or rich cheeses.
Dark Chocolate: The coffee and bitter elements love dark chocolate (70% cacao or higher).
Nuts: Especially walnuts, pecans, or hazelnuts, which echo the drink’s roasted, slightly bitter notes.
Coffee Desserts: Tiramisu, coffee ice cream, or espresso brownies.
Savory Dinner: This can accompany a meal, particularly Italian dishes or grilled meats.
The drink works as both an aperitif (before dinner) or a digestif (after dinner), making it unusually versatile.
Storage Notes
The Drink: Never pre-make stirred cocktails. They must be made fresh to order for proper temperature and dilution. However, you can pre-measure the spirits in a small bottle, keep refrigerated, then stir with ice when ready to serve.
Opened Bottles: Non-alcoholic spirits should be refrigerated after opening and used within 6-8 weeks for best quality. They won’t spoil, but flavors fade over time.
Large Ice Cubes: Make large ice cubes well in advance and keep frozen in sealed bags to prevent them from absorbing freezer odors.
Garnishes: Cut grapefruit peels up to 4 hours ahead and store in a sealed container in the refrigerator. Express them just before serving.
Batch for a Party: You can pre-mix the spirits in a bottle (use 1 oz rum + ¼ oz coffee liqueur + 1½ oz Italian bitter + ½ oz vermouth per serving). Keep refrigerated. To serve, stir 3¼ oz of the mixture with ice until very cold, then strain over fresh ice.
Frequently Asked Questions
Can I use regular (alcoholic) spirits?
Absolutely! For an alcoholic version, use: 1 oz dark rum or bourbon, ¼ oz Kahlúa or Mr. Black, 1½ oz Campari, ½ oz sweet vermouth. Same preparation method.
What if I can’t find all these non-alcoholic spirits?
Start with what you can find. The Italian bitter is the most essential. If you can’t find non-alcoholic rum, use more vermouth and add a dash of vanilla extract for complexity. If you can’t find coffee liqueur, use cold brew concentrate with simple syrup.
Is this caffeinated?
It depends on your coffee liqueur. Some non-alcoholic coffee liqueurs contain caffeine, others don’t. Check the label. If using cold brew as a substitute, yes, it will be caffeinated.
Why is my drink too bitter?
Negronis are supposed to be quite bitter – it’s their defining characteristic. If it’s too much, reduce the Italian bitter to 1 oz and increase the sweet vermouth to 1 oz. Or add ¼ oz simple syrup.
Can I shake this instead of stirring?
You can, but you shouldn’t. Shaking will make it cloudy and over-diluted. Part of a Negroni’s appeal is its clarity and silky texture, which only comes from stirring.
How long should I stir?
Until the mixing glass is very cold to the touch and your fingers are uncomfortably cold, usually 30-45 seconds of continuous stirring.
What if I don’t have a large ice cube?
Use 2-3 regular ice cubes instead. The drink will dilute faster, so sip a bit more quickly.
Is this actually a Negroni without gin?
Technically, no – a traditional Negroni uses gin. But this is inspired by the Negroni’s structure and bitterness while adding coffee and using non-alcoholic spirits. Think of it as a Negroni-style drink.
Non-Alcoholic Espresso Negroni Recipe
A sophisticated, bitter-sweet, coffee-forward mocktail inspired by the classic Italian Negroni. Four non-alcoholic spirits create remarkable complexity and depth – bitter Italian aperitif, coffee liqueur, spiced rum, and sweet vermouth, stirred to silky perfection and served over a large ice cube with an expressed grapefruit peel. Perfect for those who appreciate bold, complex flavors.
1½oz45ml non-alcoholic Italian bitter (Campari alternative)
½oz15ml non-alcoholic sweet vermouth
For Garnish
1grapefruit peelabout 2 inches long, ¾ inch wide
1large ice cubefor serving
Method
Preparation
Chill your rocks glass by placing it in the freezer for 10 minutes, or fill it with ice water while you prepare the drink.
Prepare your large ice cube for serving and set it aside.
Fill your mixing glass about halfway with regular ice cubes.
Building and Stirring
Add all liquid ingredients to the mixing glass with ice: 1 oz (30ml) non-alcoholic Jamaican spiced rum, ¼ oz (8ml) non-alcoholic coffee liqueur, 1½ oz, (45ml) non-alcoholic Italian bitter, ½ oz (15ml) non-alcoholic sweet vermouth
Stir smoothly and continuously with a bar spoon for 30-45 seconds, until the mixing glass is very cold to the touch and your fingers are uncomfortably cold. Use fluid, circular motions in one direction, keeping the spoon against the inside of the glass.
While stirring completes, cut a piece of grapefruit peel about 2 inches long and ¾-1 inch wide, with minimal white pith.
Final Steps
If you filled your serving glass with ice water, dump it out now. Place one large ice cube in the chilled rocks glass.
Place your strainer over the mixing glass and strain the stirred drink over the ice cube in the serving glass. The drink should have a deep, rich burgundy-brown color.
Express the grapefruit peel: Hold it over the drink (colored side down) and quickly twist or bend it to spray citrus oils across the drink’s surface. You should see a fine mist.
Rub the expressed peel around the rim of the glass, then drop it into the drink or hang it on the rim as garnish.
Serve immediately. Sip slowly and savor the complex flavors.
Notes
Storage: Never pre-make the complete drink. You can pre-mix the spirits in a bottle and refrigerate, then stir with ice when ready to serve.Batch for Parties: Combine 1 oz rum + ¼ oz coffee liqueur + 1½ oz Italian bitter + ½ oz vermouth per serving in a bottle. Refrigerate. To serve individual drinks, stir 3¼ oz of mixture with ice until very cold, strain over fresh ice, and garnish.Variations:
More coffee-forward: increase coffee liqueur to ½ oz
Extra bitter: increase Italian bitter to 2 oz, decrease rum to ½ oz
Sweeter: add ¼ oz simple syrup
Classic Negroni style: omit coffee liqueur, use 1 oz each of Italian bitter, sweet vermouth, and rum (or non-alcoholic gin)
Pairing Suggestions: Excellent with Italian appetizers (olives, cheese, prosciutto), dark chocolate, nuts, coffee desserts, or as an aperitif before Italian meals.Caffeination: May contain caffeine depending on your coffee liqueur – check the label if caffeine is a concern.Alcoholic Version: Use 1 oz dark rum or bourbon, ¼ oz Kahlúa, 1½ oz Campari, ½ oz sweet vermouth.When to Serve: Aperitivo hour (pre-dinner), after-dinner alternative, cocktail hour, date night, quiet evening contemplation, or as a sophisticated coffee alternative.Not a Crowd-Pleaser: This is for those who appreciate bold, bitter, complex flavors. Not recommended for people who dislike bitterness or strong coffee.
This post may contain affiliate links that earn us a small commission with no extra cost to you. We appreciate you using these links for any purchase! This Non-Alcoholic Espresso Martini is a delicious 3-ingredient mocktail made with espresso, sweetened condensed milk, and skim milk …
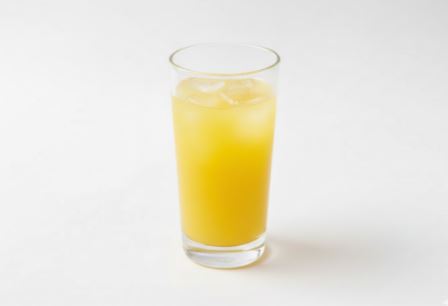
This Orange Fizz Mocktail is a refreshing non-alcoholic spritz made with non-alcoholic orange liqueur, fresh lime juice, and sparkling water that’s bright, citrusy, and absolutely delicious. Orange Fizz Mocktail If you love citrus-forward drinks, then this is the mocktail for you, and it is so …
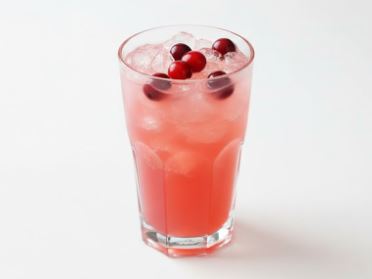
This is Cranberry Orange Fizz Mocktail – great for holiday celebrations and made with homemade cranberry-orange syrup that tastes really nice.
It is interesting to note that most cranberry mocktails rely on store-bought cranberry juice cocktail (which is basically sugar water with a hint of cranberry), but I prefer to make my own: fresh cranberries simmered with orange juice and sugar. The result is tart, sweet, citrusy, and looks absolutely stunning.
I do take liberty with adding ginger beer, though – it brings this lovely spicy warmth that makes the drink feel more complex and interesting than just cranberry-orange-soda. Also, I balance it with club soda so it’s not overwhelmingly sweet, which is a problem with many holiday drinks.
If you’ve only ever had those artificially-flavoured cranberry drinks that taste like cough syrup, I really think you’ll love this fresh, naturally delicious version.
Why Cranberry And Orange Are Great Together
Here’s the thing about cranberries and oranges: they’re meant to be together. Orange zest is often added to homemade cranberry sauce to enhance the flavour of the cranberries (if you’ve ever made Thanksgiving cranberry sauce, you know this trick), and orange juice provides delicious, natural sweetness to offset the tartness of cranberries.
Fresh cranberries are peak autumn/winter produce – they’re tart, vibrant, and packed with vitamin C and antioxidants. When you simmer them with orange juice and sugar, they release their colour and flavour into the syrup, creating this beautiful ruby-red liquid that looks and tastes special.
The ginger beer adds sweetness, but also plays beautifully with the tart cranberries and bright orange. It makes the whole drink feel more sophisticated.
This mocktail is perfect for holiday brunches, Christmas gatherings, New Year’s Eve celebrations, or really any winter occasion when you want something festive and delicious without alcohol.
Cranberry Orange Fizz Mocktail Ingredients
This recipe makes 1 mocktail, but I’m also going to give you instructions for making a whole pitcher because chances are good you’ll want to serve this to more than one person. The cranberry-orange syrup can be made ahead and keeps in the fridge, which makes this perfect for entertaining.
1. CRANBERRY ORANGE SYRUP
This homemade simple syrup is the foundation of the whole drink. It’s easy to make with ingredients you can find at any grocery store:
Fresh or frozen cranberries – About 2 cups (12 oz bag) for a full batch of syrup. Fresh cranberries are ideal if you can find them (they’re in season autumn through winter), but frozen work beautifully too! Don’t thaw them first – just use them straight from the freezer.
Fresh orange juice – From 1-2 fresh oranges (about 1/2 cup juice). FRESH orange juice makes such a difference here! It’s brighter, sweeter, and more complex than bottled. The orange juice provides natural sweetness and that classic citrus flavour that pairs perfectly with tart cranberries.
Sugar – About 1 cup granulated sugar. This combines with the cranberries and orange juice to create a syrup consistency.
Water – About 1 cup. Combined with everything else, this creates the liquid base.
The method is simple: simmer fresh cranberries with orange juice, sugar, and water until the berries burst and release all their gorgeous ruby-red colour. Then strain out the solids, and you’re left with this beautiful, flavourful syrup that keeps in the fridge for up to 2 weeks!
One batch of syrup makes enough for about 12 mocktails, so you can prep once and enjoy drinks all season long.
2. FRESH LEMON JUICE
Fresh lemon juice – About 1 tablespoon per drink (half a lemon). I’ll say it again because I’m passionate about this: FRESH ONLY! There are only 4 ingredients in this mocktail, so every single one needs to be top quality. Fresh lemon juice is bright, tart, and alive. Bottled lemon juice is bitter and sad.
The lemon brightens everything and adds acidity that balances the sweet syrup.
3. GINGER BEER
Ginger beer – About 3 ounces (a bit less than 1/2 cup) per drink. Ginger beer is a spicy, sweet soda that adds warmth and complexity. It’s not alcoholic despite the name – it’s just soda pop like root beer.
Brands like Fever-Tree, Q Ginger Beer, or Barritt’s work well. You want something with a good ginger bite, not just sweet.
Don’t have ginger beer? Use ginger ale instead. It’s milder and less spicy, but still delicious. The drink will be a bit sweeter and less complex, but it totally works.
4. CLUB SODA OR SPARKLING WATER
Club soda or sparkling water – About 3 ounces (a bit less than 1/2 cup) per drink. This cuts the sweetness and adds more fizz without adding more sugar. It helps balance the cranberry-orange syrup and ginger beer so the drink isn’t overwhelmingly sweet.
Any brand of club soda or plain sparkling water works! Must be chilled.
5. GARNISH
Fresh or frozen cranberries – A few cranberries floating on top look beautiful. Frozen cranberries work just as well as fresh, and they act like little ice cubes that add flavour as they thaw.
Orange slices – Navel orange, blood orange, or even dried orange slices all look great. A twist of orange peel adds aromatic oils and looks nice.
You don’t need more garnishes – this drink is naturally beautiful. Simple cranberries and/or orange is perfect.
How To Make Cranberry Orange Syrup
This syrup is stupid-easy and makes your kitchen smell like the holidays. I usually make a batch on Sunday and keep it in the fridge all week for whenever I want a festive drink!
Combine everything – In a medium saucepan, combine 2 cups fresh or frozen cranberries, 1/2 cup fresh orange juice, 1 cup sugar, and 1 cup water. Stir to combine.
Bring to a boil – Place over medium-high heat and bring to a boil, stirring occasionally to dissolve the sugar. You’ll hear the cranberries start to pop as they heat up – this is exactly what you want.
Simmer – Once boiling, reduce the heat to medium-low and let simmer for about 10-15 minutes, stirring occasionally. The cranberries will burst and collapse, releasing all their gorgeous ruby-red colour and tart flavour into the syrup. The mixture should be vibrant red and smell incredible – like cranberry sauce but lighter and more citrusy.
Strain – Set a fine-mesh strainer over a jar or bowl and pour the cranberry mixture through, pressing gently on the solids to extract all the liquid. Discard the cranberry solids (or save them for spooning over yogurt or ice cream).
Cool and store – Let the syrup cool to room temperature, then transfer to a sealed jar or bottle. Refrigerate for up to 2 weeks. The syrup will thicken slightly as it cools.
The finished syrup should be a beautiful deep ruby-red colour, smell like cranberries and oranges, and have a sweet-tart flavour that makes you want to drink it straight (don’t, it’s too concentrated, but the temptation is real.).
How To Make Cranberry Orange Fizz Mocktail
Once the syrup is ready, making each drink is very easy.
Combine in mixing glass – Fill a mixing glass (or the body of a cocktail shaker, or even just a mason jar – anything works!) with ice. Add 1 ounce (2 tablespoons) of cranberry-orange syrup, 1 tablespoon fresh lemon juice, 3 ounces of ginger beer, and 3 ounces of club soda.
Don’t have a mixing glass? No problem. You can build this directly in the serving glass if you prefer. The mixing glass just helps combine everything nicely before serving.
Stir gently – Use a cocktail stirrer or spoon to gently stir everything together. Just a few stirs – you want to combine the ingredients without losing all the carbonation.
Strain into serving glass – Fill a rocks glass (or whatever glass you’re using) with fresh ice cubes. Strain the mocktail from the mixing glass into the serving glass.
If you made it directly in the serving glass, you can skip this step – just stir, and you’re done!
Garnish – Drop a few fresh or frozen cranberries on top (they’ll float beautifully). Add an orange slice to the rim or drop it in the glass. Or twist a piece of orange peel over the drink to release the aromatic oils, then perch it on the rim. Serve immediately.
The drink should be a gorgeous ruby-red colour with bubbles rising through it, smell like cranberries and oranges with a hint of ginger, and taste tart, sweet, citrusy, and wonderfully festive.
What I Serve With This Mocktail
If you’re using this for a holiday drink, here are some ideas on what to serve it with:
If you’re hosting and want multiple mocktail options, my Sweet Basil Café Mocktail or Cherry Rosemary Mocktail offer different flavour profiles, or stick with the holiday theme with something like a Sparkling Blueberry Ginger Mocktail.
Please Note: The first time I made this, I used ginger ale instead of ginger beer because I couldn’t find ginger beer at my regular grocery store. It was good, but definitely milder and less interesting. Once I tracked down actual ginger beer, the difference was noticeable – much more complex and sophisticated. So, it’s worth using the ginger beer if you can.
Cranberry Orange Fizz Mocktail FAQs
Can I use frozen cranberries instead of fresh?
Absolutely! Frozen cranberries work just as well as fresh for making the syrup. Use them straight from the freezer – no need to thaw. Frozen cranberries are available year-round, which is great if you want to make this outside of fresh cranberry season (September through December). The flavour and colour will be identical.
How long does the cranberry orange syrup last?
The syrup will keep in a sealed container in the refrigerator for up to 2 weeks. So, you can make it ahead – prepare the syrup on Sunday, and you can whip up mocktails all week (or throughout the holiday season) in just minutes. Some people even freeze the syrup in ice cube trays for longer storage, then thaw a cube or two when needed.
Can I make this without ginger beer?
Yes. Use ginger ale instead for a milder ginger flavour (it’ll be sweeter and less spicy but still delicious). Or skip the ginger element entirely and use lemon-lime soda or just more club soda. The drink will be less complex but still tasty! For a completely different vibe, try using cranberry ginger ale if you can find it.
What’s the difference between ginger beer and ginger ale?
Despite the name, ginger beer contains no alcohol – it’s just soda pop like root beer. The difference is in flavour and intensity: ginger beer is spicier, more robust, and has a strong ginger bite. Ginger ale is milder, sweeter, and has a gentler ginger flavour. Both are non-alcoholic sodas, but ginger beer makes a more interesting, complex mocktail!
Can I use bottled cranberry juice instead of making the syrup?
You could technically use store-bought cranberry juice cocktail and skip the syrup-making step, but the flavour won’t be nearly as good. Most cranberry juice cocktail is heavily sweetened and have that artificial “cranberry juice” taste rather than real cranberry flavour. The homemade syrup uses fresh cranberries and orange juice for a much more vibrant, natural flavour. Plus, it only takes about 20 minutes to make and lasts 2 weeks. So, if you ask me, I would say it’s totally worth it.
What should I do with the leftover cranberry solids after straining?
Don’t throw them away! The cooked cranberries still have flavour and are delicious spooned over yogurt, oatmeal, ice cream, or pancakes. You could also blend them smooth and use as a fruit spread, or stir them into muffin or quick bread batter. Some people even add them to homemade cranberry sauce for extra texture. Zero waste!
Can I make this in a pitcher for parties?
Absolutely. Combine 12 oz cranberry-orange syrup (entire batch) with 3 oz fresh lemon juice, 9 oz ginger beer, and 9 oz club soda in a large pitcher or punch bowl. Garnish with cranberries and orange slices. Serve over ice. This makes about 12 servings. For best results, combine the syrup and lemon juice ahead of time and refrigerate, then add the ginger beer and club soda right before serving.
Cranberry Orange Fizz Mocktail Recipe
This festive holiday mocktail features homemade cranberry-orange syrup made from fresh cranberries and orange juice, combined with bright lemon, spicy ginger beer, and club soda. The result is tart, sweet, citrusy, and wonderfully sophisticated – perfect for holiday gatherings! The syrup can be made up to 2 weeks ahead, making this ideal for entertaining. Zero alcohol, 100% delicious.
2cupsfresh or frozen cranberries12 oz bag – Note 1
½cupfresh orange juicefrom 1-2 oranges – Note 2
1cupgranulated sugar
1cupwater
For Mocktail
1ozcranberry orange syrup2 tbsp
1tbspfresh lemon juiceabout ½ lemon – Note 3
3ozginger beerbit less than ½ cup – Note 4
3ozclub soda or sparkling waterbit less than ½ cup
Ice cubes
Garnish
Fresh or frozen cranberries
Orange slicesnavel, blood orange, or dried
Orange peel twist
Fresh rosemary or cinnamon stickoptional holiday
Method
Make cranberry orange syrup (can be done up to 2 weeks ahead):
In a medium saucepan, combine 2 cups cranberries (fresh or frozen), ½ cup fresh orange juice, 1 cup sugar, and 1 cup water. Stir to combine.
Place over medium-high heat and bring to a boil, stirring occasionally to dissolve sugar. You'll hear the cranberries start popping.
Once boiling, reduce heat to medium-low and simmer for 10-15 minutes, stirring occasionally. Cranberries will burst and collapse, releasing gorgeous ruby-red colour and tart flavour. Mixt
Set a fine-mesh strainer over a jar or bowl. Pour cranberry mixture through, pressing gently on solids to extract all liquid. Discard solids (or save for topping yogurt/ice cream!).
Let syrup cool to room temperature, then transfer to sealed jar or bottle. Refrigerate for up to 2 weeks. Syrup will thicken slightly as it cools. Should be deep ruby-red, smell like cranberries and oranges, taste sweet-tart.
Make the mocktail:
Fill a mixing glass (or cocktail shaker body, or mason jar) with ice. Add 1 oz (2 tbsp) cranberry-orange syrup, 1 tbsp fresh lemon juice, 3 oz ginger beer, and 3 oz club soda. Don't have mixing glass? Build directly in serving glass!
Use cocktail stirrer or spoon to gently stir everything together. Just a few stirs to combine without losing carbonation.
Fill a rocks glass with fresh ice cubes. Strain mocktail from mixing glass into serving glass. If you built directly in serving glass, just stir and you're done!
Drop a few fresh or frozen cranberries on top (they float beautifully!). Add orange slice to rim or drop in glass. Or twist orange peel over drink to release oils, then perch on rim.